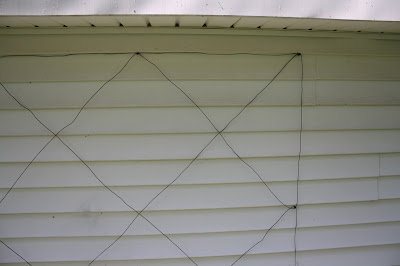
It's that time of year again, when the weather is warm and outdoor projects are all the rage on Pinterest. Today's project turns a bland space into a calm and inviting area without spending a lot of money. This project was done by my friend Audrey who also posted here. We'd love to see some of the outdoor projects you've been up to!
Wire Garden Wall Trellis
On
our property there are 3 buildings: our house, a veterinary clinic & an old
barn.
On
one part of the clinic there is a large open wall space that was in need of
something… but bushes are expensive,
Here was the inspiration:
 |
Source |
Minus
the fountain… focus on the vines growing on the wall.
What you’ll need:
Paper
Ruler
Tape Measure
Decking ScrewsPencil &
Wire
Needle nosed pliers with wire clippers
Seeds for the vine of your choice
First
thing I had to do was measure my space and decide how much of it I wanted to
cover. There were about 14 feet between
these 2 windows:
So
I decided to do a trellis that would be 10 feet wide and 5 feet tall.
I
drew out a plan:
I
used a 1’ to 1” ratio because that was easiest.
Drawing
out your trellis is a great thing to do because originally I thought I would
run the wire in 1’x 1’ diamonds/squares but when I started to draw it out it
looked waaay too busy. Instead I went
with 2’x 2’ diamonds/squares.
I
drew dots along the perimeter for every 1’ then started to draw in where my
wires were going to go. Whenever I hit
the perimeter I darkened the dot because that is where I would be placing a
screw on the wall. (I hope this is
making sense!)
Once
I finished my drawing I went outside and started measuring
& installing the
screws.
(This
was pretty quick and easy because our siding was 4” planks so I didn’t have to
measure vertically at all. Yay!)
(If
you look closely, this is just the screws.)
Once
all of the screws were up, I took the wire and started in the top corner and
followed my diagram for where I should go.
(Here’s
a close-up of one of the screws wrapped with wire once I was done.)
Next
I started on the screw that was second from the top on the left and followed it
up to the second screw from the left on the perimeter and so on until the whole
grid was up on the wall.
When
I finished I planted a row of Morning Glory seeds in the dirt under the new
trellis. I knew I wanted an annual vine
and morning glories are fast growers.
When
it was all said and done it was much easier done than said.
Funny
how that is.
 |
| Here is the trellis as soon as I finished. |
 |
| Here is the trellis today. |
I chose to plant an annual flowering vine because we spent a good part of the summer pulling invasive Baltic ivy off of a different part of that building. It was not fun. Next summer I would like to use a vine with smaller leaves so that you can see the shape of the trellis a little bit better.


No comments:
Post a Comment