Wednesday, April 16, 2014

Baby Sandals and Hairbow from a T-shirt

I made this project back before Baby girl was walking and now that it's getting warmer outside I thought it would be a good time to post it for others.

Recycling a t-shirt is one of the easiest projects because you can make almost anything from it including, sandals, headbands, yarn, scarves, dog toys, pillows, and just about anything else that you would use ordinary fabric for. I used these instructions for the sandal base and these instructions for the flowers that I created.
Here are my finished products:

Sandals
Hair clip
I wanted to use only items that I already had around the house so my supplies were slightly different than the original directions.  
Here is how I did it:
To make the sandals I used 1/4 yd white cotton, needle and white thread, an old undershirt, scissors, measuring tape, and a hot glue gun.
I first measured my baby's foot around her arch which was approximately 4 inches. Then I cut six 4 inch strips of the t-shirt.
Then I pulled the ends of the strips to get the t-shirt to roll (I had to cut a little more off the ends to keep them at 4 inches since I stretched the strips out).
Then I cut my cotton into six ovals. The original instructions called for felt but I didn't have any so I needed to make my cotton stiff enough to accommodate the weight of the flower.  I glued three ovals together to create the base of one sandal and three together for the other sandal. They measured 1 inch by 1 1/2 inch.
Next I sewed the t-shirt strips to the cotton ovals. You could probably glue them if you didn't want to sew them on but I thought they might hold up a little better if I sewed them. My baby kicks off her shoes and socks in about 5 seconds so I wanted the sandals to stay on at least that long.


 Then I sewed the bottoms of the two end straps together to created the foot strap. The other strap will go behind her ankle.
Next I made a template for my flower. I cut out 9 flowers from the t-shirt.

 Once the flowers were cut out I folded the flowers in half.
 Then I folded them in quarters.
 I glued four flowers onto the base of the sandal.

 Then I glued four more flowers perpendicular to the first four flowers.
 For the center flower I rolled the last quartered folded flower into a cone.
Then I used a huge glob (that's a technical term) of glue and smushed it down into the center. To make the flower fuller I put dabs of glue onto the petals and stuck them onto the petals above them until it looked fluffy enough to me. (Sorry for the blurry picture I was trying to get a shot before the hot glue dried)
And voila...baby sandals

I repeated the steps to make the flower for the hair clip. Then I glued white gross grain ribbon onto a metal clip and glued the flower on top.

Saturday, December 21, 2013

Christmas Card Display


Christmas Card Display
This was by far my easiest and quickest project thus far, thanks to already having made my painted chalkboard. All I did was put up some red yarn inside the frame and hang my cards with clothes pins. And it was a zero cost project because I had everything on hand. Here is the original pin. Here are some other Christmas card display ideas:

Christmas Card Display
Source

Christmas Card Display
Source

Christmas card display
Source

Monday, November 11, 2013

Painted Canvas Dropcloth Rug

Painted canvas rug
This project became a little more in depth than I anticipated. Usually I have my husband around to help me simplify my ideas but on this particular weekend he was out of town so I took on a much more intricate project than I anticipated. My suggestions for the future: Choose a simple design and only 2-3 paint colors for your rug otherwise it becomes very time consuming.

Supplies:
1 painters canvas in the size you desire (I used 6x9)
Acrylic paint or water based interior wall paint in your choice of colors
Paintbrushes and rollers
Plastic sheeting
Stencils, sponges or any other medium you wish for your pattern
Polycrylic (optional)

Step One:
Lay out your canvas and iron it as best as possible. This will help your design go on straight once you start painting. If you need to you can use hem tape or sew any uneven edges at this time. I laid my canvas out and placed a towel underneath as I ironed it.
Painted canvas rug step 1

Step Two:
Tape off the design you want. I free-handed my design but wanted to make sure that my lines were straight so I taped them out.
Painted canvas rug step 2

Step Three:
Begin painting your design making sure to use a thick coat of paint since it will absorb into the fabric. don't worry about it going through to the backside because the plastic sheeting will protect your floor/ground from getting paint on it. Allow it to dry at least 1 hour before doing any touch ups.
Painted canvas rug step 3

Step Four: Optional
Cover in two coats of polycrylic letting it dry between coats. This is great for rugs that will be in high traffic and outdoor areas. It also allows you to sweep your rug easily.

Painted rug step 4
Whether you cover your rug in polyacrylic or leave it as is you will be able to throw it in the washing machine whenever you need to and the paint will remain in tact. Keep in mind though that the rug may shrink a bit as most canvas is 100% cotton.

I love our rug and feel like it really pulled the room together. I was able to use some paint colors that I had already used on furniture in the room to really unite the space.

Here are some of the pins I drew inspiration from:

drop cloth rug tutorial
Source
DIY Rug Makeover: I turned over one of our old stained rugs, taped off the pattern I wanted and painted stripes with regular interior paint.
Source
Source

Monday, November 4, 2013

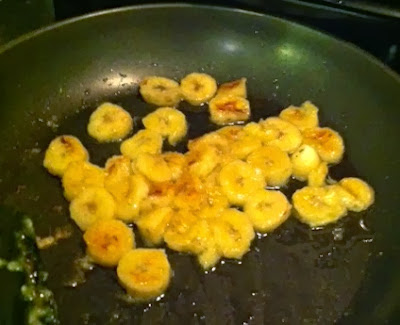
Fried Bananas

Fried bananas
This recipe was delicious and quick. I think it would be great for a party or just for one because of how simple it is. I followed the directions exactly as the poster described and it turned out wonderful. Here is the original pin.

The directions were simple, I made it for two so I just doubled the recipe

Ingredients:
2 slightly under-ripened bananas sliced
2 tablespoons of honey
A sprinkle of cinnamon

Directions:
1. Drizzle olive oil in a skillet on medium heat
2. Place banana slices in pan and let cook for about 2 minutes on each side
3. While bananas are cooking stir together honey and 2 tbs of water
4. Remove pan from heat and pour honey mixture over bananas
5. Let cool and sprinkle with cinnamon and enjoy!


    Tuesday, September 24, 2013

    Painting Laminate Furniture

    I originally posted this over here but wanted to share it on This Pinterest Life since the idea came from scrolling through a million google images and Pinterest pins.

    Can't be done you say? Here's the proof:

    Total Cost: $11
    Supplies Needed:
    Zissner Cover Stain Primer in white
    Whatever color paint you'd like for your project (I used white spray paint)
    Clear lacquer spray or polyurethane
    Foam paint roller


    Ignore the dog toy, I didn't notice it when I was taking the photo.

    I bought a laminate table top from the Salvation Army for $7.  I purchased a 2x4x12 piece of wood at Lowe's for $5 and had them cut it into 4 pieces at 29" each. I bolted the legs on and painted the entire table and legs in Zinsser Cover Stain Primer.
    This is the primer

    I used a 4" foam roller to paint with and stored
    it in a ziplock bag in the freezer between
    coats so it wouldn't dry out

    I did three coats to ensure maximum coverage. FYI It is really stinky even with adequate ventilation. Then I used interior/exterior spray paint and did two coats of white paint followed by two coats of clear gloss spray lacquer. After a few days of airing out the paint fumes dissipated and now we have a dining set.  Not bad for a couple hours of work and 18 bucks.

    Here are some other tutorials I found on Pinterest:
    Source

    Source

    Thursday, August 22, 2013

    DIY 20 Minute No Sew Tent

    I've seen some great pins on Pinterest for DIY tents. Here are some of my favorite tents and forts I've seen:
    DIY No-Sew Teepee
    Source

    www.mommo-design.blogspot.com  Recycling in kids room
    Source

    A DIY tent for the little ones:) Made with an old dining table. Just need some little fabric, needle, and thread....
    Source
    Woodland Theme: DIY Tent
    Source

    This is the basic tutorial I followed for my tent with a few modifications...
     I was able to create this project for $0 because I already had all of the supplies on hand left over from other projects. Here are the supplies I used:

    • 2 old curtain panels
    • 3- 3/8" dowel rods
    • 4 pieces of scrap wood approximately 2" wide x 4' long
    • Piece of ribbon cut to desired length
    • Drill with 3/8" bit and 1/4" bit
    • Staple gun
    • Painter's or masking tape
    Step One: I taped my scrap wood pieces together to insure that the holes would be placed in identical spots on each of them. First I taped the front pieces together then the back pieces, making sure to space the holes of all of them at the same distance and to make sure my scrap wood pieces were even in length.

    Step Two: I drilled pilot holes into the pairs of taped wood with my 1/4" bit to make sure I didn't split the wood with my larger bit

    Step Three: I separated the wood strips and drilled the larger 3/8" holes. I used my dowel rods as guides to make sure that the holes were evenly drilled. I made sure that the dowel rods were snug fitting but had just enough room to move since I wanted to be able to fold the tent closed.

    Step Four: I fit one end the dowel rods  through the holes I had drilled for the front and back of the tent.

    Step Five: I slid the first curtain panel onto the dowel rod then placed the back pieces of wood onto the dowel. I used light pressure to push down on the strip of wood to make sure the dowel rod was fully wedged in. Then I repeated the process for the other side with my second curtain panel. At this point I had two panels that were attached on one end and not attached to anything on the other end.

    Step Six: I started with the first panel and and using my staple gun I stapled the excess fabric to the  the sides of the tent (where the wood strips are). Then I overlapped the second panel making sure to gather the excess fabric so that the curtain didn't sag and stapled it to the wood. Once I finished you couldn't even see the staples (I pulled back some fabric to show it for the picture). And the staples are flush against the wood so I don't have to worry about them catching on clothes or skin.

    Step Seven: I added a piece of ribbon about 2 1/2 feet long to the back side of the tent as tendion to make sure that the tent would fall all the way open.

    And here is the finished project!
    Morning snack in her new tent

    It would look great with some fun colored fabric or even ribbon ties instead of staples but I was determined to make it a zero cost project and used what I had on hand. The whole process only took about 20 minutes to put together and my daughter loves it!