Wednesday, July 31, 2013

Wire Garden Wall Trellis


It's that time of year again, when the weather is warm and outdoor projects are all the rage on Pinterest. Today's project turns a bland space into a calm and inviting area without spending a lot of money. This project was done by my friend Audrey who also posted here. We'd love to see some of the outdoor projects you've been up to!

Wire Garden Wall Trellis

On our property there are 3 buildings: our house, a veterinary clinic & an old barn. We moved in last May and I quickly got to work settling into the house since I was almost 7 months pregnant.  So the yard had to wait until this year.
On one part of the clinic there is a large open wall space that was in need of something… but bushes are expensive, so what could I do on the cheap to fill this wall?

Here was the inspiration:


Source
Minus the fountain… focus on the vines growing on the wall. I knew I wanted to do something different and this was just the thing!

What you’ll need:

Paper
Ruler
Tape Measure
Decking ScrewsPencil &
Wire
Needle nosed pliers with wire clippers
Seeds for the vine of your choice

First thing I had to do was measure my space and decide how much of it I wanted to cover.  There were about 14 feet between these 2 windows:

So I decided to do a trellis that would be 10 feet wide and 5 feet tall.

I drew out a plan:
I used a 1’ to 1” ratio because that was easiest.


 Drawing out your trellis is a great thing to do because originally I thought I would run the wire in 1’x 1’ diamonds/squares but when I started to draw it out it looked waaay too busy.  Instead I went with 2’x 2’ diamonds/squares.
I drew dots along the perimeter for every 1’ then started to draw in where my wires were going to go.  Whenever I hit the perimeter I darkened the dot because that is where I would be placing a screw on the wall.  (I hope this is making sense!)

Once I finished my drawing I went outside and started measuring 
& installing the screws.

(This was pretty quick and easy because our siding was 4” planks so I didn’t have to measure vertically at all. Yay!)
(If you look closely, this is just the screws.)

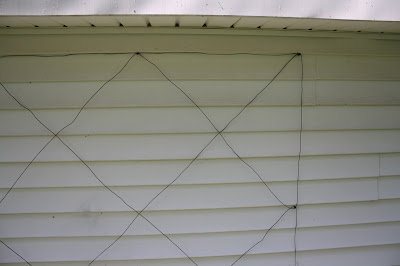
Once all of the screws were up, I took the wire and started in the top corner and followed my diagram for where I should go.  For instance, I started in the top left corner, so I wrapped my wire around that screw once to secure it then stretched the wire to the 4th screw from the left and wrapped it around that screw once, then I stretched it up to the top right corner, then used the wire to create the 4 sides of the rectangle on the perimeter.

(Here’s a close-up of one of the screws wrapped with wire once I was done.)

Next I started on the screw that was second from the top on the left and followed it up to the second screw from the left on the perimeter and so on until the whole grid was up on the wall.

When I finished I planted a row of Morning Glory seeds in the dirt under the new trellis.  I knew I wanted an annual vine and morning glories are fast growers.


When it was all said and done it was much easier done than said. 
Funny how that is.

Here is the trellis as soon as I finished.
Here is the trellis today.
I chose to plant an annual flowering vine because we spent a good part of the summer pulling invasive Baltic ivy off of a different part of that building. It was not fun. Next summer I would like to use a vine with smaller leaves so that you can see the shape of the trellis a little bit better.


Tuesday, July 23, 2013

Gender Reveal Baby Announcement

We didn't find out the sex of our first baby so I wanted to do something really fun for our gender reveal for number two. This also was our first Facebook announcement about our pregnancy so we were very excited to share with all of our friends. I scoured the many pins on Pinterest and here is my finished product.
I used a combination of Apple photoshop and the Red Stamp application to create this announcement. The funny thing is that this shot took about 30 seconds to get and was taken late in the day. I had tried to set up a photo shoot of sorts that morning, in a beautiful garden, and in the process of trying to wrangle a tantrum-throwing toddler and balloons, the balloons ended up getting all tangled up from the wind and then when I turned my back to try to settle my child they blew away (Yes, they were weighted! The wind coming off the Bay was just that strong). So later in the day Baby Girl and I walked to the grocery and picked up some more balloons, on the way home I saw this blue wall and decided to just go for it and I'm so glad it turned out!

Here are some of my other favorite gender announcements and reveals from Pinterest:
Gender announcement including older sibling - it's a boy! - Suzi Bowles Photography - Orange County  more similar images here: http://www.suzibowles.com/blog/2013/4/our-own-little-announcement-aliso-viejo-maternity-photographer
Source
It's a girl
Source

Gender Announcement Ideas! It's a boy! Scrabble letters.
Source

Source
http://25.media.tumblr.com/79d9b38f135b043a50f47fbc61efd912/tumblr_mida3k8aoD1rg8wjto1_500.jpg
Source

Wednesday, July 17, 2013

Picture Ledges

Picture ledges! They are all the rage on Pinterest...
http://media-cache-ec3.pinimg.com/originals/67/a0/6b/67a06b590247883d3b85d6da56121903.jpg
Source
              http://media-cache-ec3.pinimg.com/originals/bf/b9/ff/bfb9ff0f90d158b8b07500da01b777c8.jpg
Source

I've been wanting to do this project ever since we moved into our new rental, back at the end of February.  I had a hard time deciding which wall I was going to use but ended up going with the wall in our living room to add some extra color to the space. Even though it is broken up by a window I felt that that picture ledges would be the perfect spot.

I got inspiration from here and here as they were some of the most frequently pinned posts. And here is how I did it for a little less than $10 per picture ledge.
Supplies:
Wood in the length you need for your wall (I cut mine to 3 feet each)
Rounded trim (find it in the trim section at your hardware store)
L brackets
Screws
Finishing nails or nail gun
Paint
Wood glue
Drill

Steps:
1. Decide the length you want your ledges to be then using a sawzall or circular saw cut them, or you can have the nice employees at your local hardware store do this for you. Cut your rounded trim to the same lengths as your ledges.
The wood I used for the base of the picture ledges

I cut mine in 4 three foot pieces
 2. Position your rounded trim where you would like them to go to make sure they line up. If your wood is slightly warped then you will have to guide them into place as you are nailing them to make sure they line up evenly.

 3. Apply wood glue to the rounded trim then use finishing nails or a nail gun to secure the edge.

I used wood glue I had on  hand

Working from one end to the other, I positioned the rounded trim so it laid flush with my ledge base.
3. Paint the ledges in the color of your choice
I didn't think to take a picture of this step but I just used paint I had on hand and a regular brush. I did two coats.

4. Using a level and a straight edge draw a line where you want your shelf positioned
5. Find your studs then pre-drill holes into your ledges to line up with the studs. Then you can screw your L brackets into the ledges.
My ledges after I painted them and pre-drilled holes
After attaching the brackets to the ledge
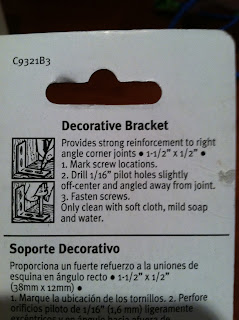
Here are the brackets I used:

I attached them exactly as the directions on the packaging stated.

6. Line up your ledges to the wall (your brackets should already be lined up to your studs). If you live in an old house or apartment like mine your walls may be a bit uneven from settling. That's okay, once the ledges are hung you can use light pressure to bend the brackets slightly to be level for your pictures.


7. Place your pictures to cover the brackets and you're done. I hung a few and stacked the rest.

And here is the finished product!
DIY Picture Ledge
The ledges took about 2 hours to assemble and paint and an hour to hang, not bad for about $35 bucks. Now I just need to make my curtains and hang them up and this wall will be complete (oh, and replace that light bulb-ha!)